📜 解读 react 原理系列 - react-router
本篇文章是解读 react 原理系列的第六篇 - react-router,一起走进 react router 的世界。
单页应用
单页应用是在使用一个 html 的前提下,一次性加载 js、css 等资源,所有页面都在一个容器下,页面切换的实质是组件的切换。

路由原理
单页路由实现方式,一直是前端面试中容易提问到的点之一,从路由实现到路由原理,都是必须要掌握的知识点。
history、react-router、react-router-dom
了解 router 原理之前,先用一幅图表示 history、react-router、react-router-dom 三者的关系:
history:react-router 的核心,包括两种路由模式下改变路由的方法、监听路由变化的方法等
react-router:既然有了 history 路由改变/监听的核心,那么就需要调度组件负责派发这些路由的更新,也需要容器组件通过路由更新来渲染视图,react-router 在 history 的基础上增加了 Router、Route、Switch 等组件来处理视图渲染。
react-router-dom:在 react-router 的基础上,增加了一些 UI 层面的扩展比如 Link、NavLink,以及两种路由模式的根部路由 BrowserRouter、HashRouter

两种路由模式
路由主要分为两种模式,一种是 history 模式,另一种是 hash 模式:
- history 模式:http://www.xxx.com/home
- hash 模式:http://www.xxx.com/#/home
如何在 react 项目中运用这两种路由模式?
- history 模式
| |
- hash 模式
| |
对于 BrowserRouter 或 HashRouter,实现原理很简单,就是 react-router-dom 根据 history 提供的 createBrowserHistory 或 createHashHistory 创建出不同的 history 对象,以 BrowserRouter 为例:
| |
通过 createBrowserHistory 创建一个 history 对象,传给 Router 组件。
react 路由原理
上面说到的 history 对象,就是整个路由的核心原理,里面包含了监听路由、改变路由的方法。两种模式的处理有一些区别,但本质上区别不大。
BrowserHistory
改变路由
改变路由,指的是通过调用 api 实现路由跳转,比如开发者可以在 react 应用中调用 history.push 改变路由。
window.history.pushState
本质上是调用 window.history.pushState 方法:
| |
- state:与指定网址相关的状态对象,popstate 事件触发时,该对象会传入回调函数
- title:新页面的标题
- path:新的地址,必须与当前页面处在同一个域
window.history.replaceState
| |
参数与 pushState 一样,这个方法会修改当前 history 对象记录,但是 history.length 的长度不会改变。
监听路由 - popstate
| |
同一个文档的 history 对象出现变化时,就会触发 popstate 事件,无需刷新页面。
用 window.history.pushState 或者 window.history.replaceState 不会触发 popstate 事件。popstate 事件只会在浏览器某些行为下触发, 比如点击后退、前进按钮或者调用 window.history.back、window.history.forward、window.history.go 方法。
HashHistory
hash 路由原理和 history 相似。
改变路由 - window.location.hash
通过 window.location.hash 属性获取和设置 hash 值。开发者在 hash 路由模式下的应用中切换路由,本质上是改变 window.location.hash 的属性值。
监听路由 - onhashchange
| |
hash 模式下,监听路由变化用的是 hashchange。
react-router 基本构成
history、location、match
在路由页面中,开发者通过访问 props,发现路由页面中的 props 被加入了这几个对象:
- history:保存了改变路由方法 push、replace,监听路由方法 listen 等
- location:当前状态下的路由信息,包括 pathname、state 等
- match:当前路由的匹配信息的对象,存放当前路由的 path 等信息
路由组件
Router
Router 是整个应用路由的传递者和派发更新者。
开发者一般不会直接使用 Router,而是使用 react-router-dom 中的 BrowserRouter 或 HashRouter,两者的关系就是 Router 作为一个传递路由和更新路由的容器,而 BrowserRouter 或 HashRouter 是不同模式下向 Router 容器注入不同的 history 对象。
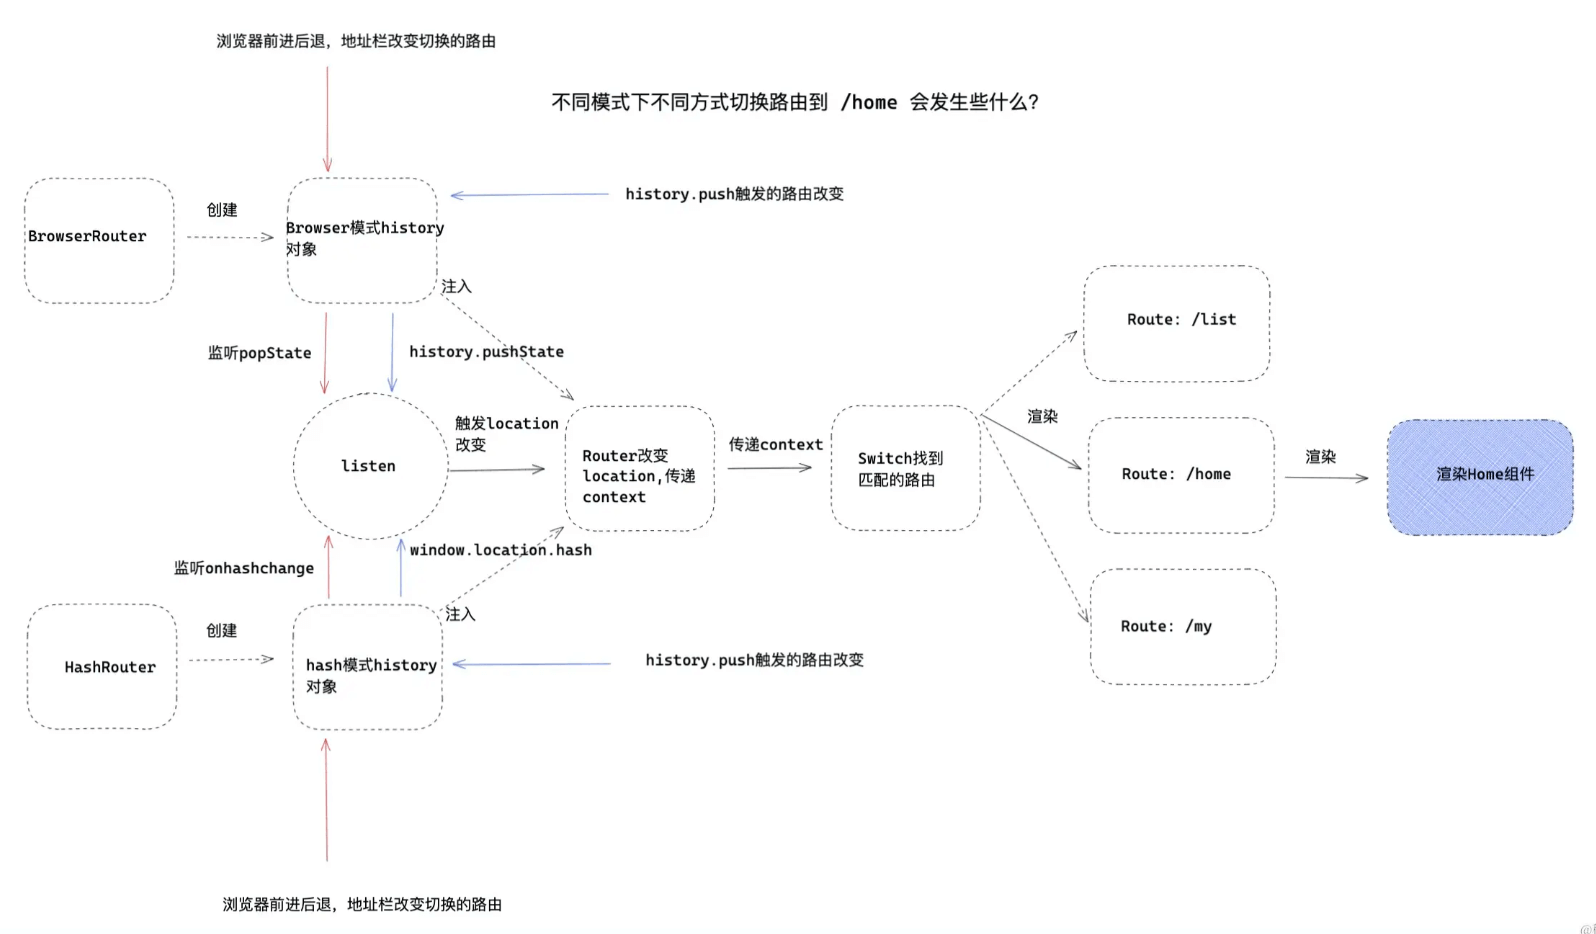
用一幅图来描述 Router 和 BrowserRouter 或 HashRouter 的关系:

让我们来看一下 Router 内部做了什么?
| |
首先 react-router 通过 context 上下文的方式传递路由信息,context 改变,会使消费 context 的组件更新。当开发者触发路由改变,就能够重新渲染匹配的组件。
props.history 是通过 BrowserRouter 或 HashRouter 创建的 history 对象。当路由改变,会触发 listen 方法,传递新生成的 location,通过 setState 改变 context 中的 value。所以改变路由,本质上是 location 改变带来的更新作用。
Route
Route 是整个应用路由的核心部分,它的工作主要是:匹配路由、路由匹配、渲染组件。
由于整个路由状态是用 context 传递的,所以 Route 可以通过 RouterContext.Consumer 来获取上一级传递来的路由进行路由匹配,如果匹配,就渲染子代路由。并利用 context 逐层传递的特点,将自己的路由信息,向子代路由传递下去,轻松实现了嵌套路由。
我们先来看一下 Route 的用法:
| |
Route 接受 path 属性,用于匹配正确的路由,渲染组件。
四种形式:
- component 形式:将组件直接传递给 Route 的 component 属性,Route 可以将路由信息隐式注入到页面组件的 props 中,但无法传递父组件中的信息,比如 mes
- render 形式:Route 的 render 属性,可以接受一个渲染函数,函数参数就是路由信息,可以传递给页面组件,还可以混入父组件信息
- children 形式:直接作为 children 属性来渲染子组件,但这样无法直接向子组件传递路由信息,但可以混入父组件信息
- renderProps 形式:可以将 children 作为渲染函数执行,可以传递路由信息,也可以传递父组件信息
Route 可以加上 exact 属性,用来精确匹配,pathname 必须和 Route 的 path 完全匹配,才能展示该路由信息。
| |
一旦开发者在 Route 中写上 exact = true ,表示该路由页面只有在 /router/component 这个格式下才能渲染,/router/component/a 会被判定不匹配,导致渲染失败。
如果是嵌套路由的父路由,千万不要加 exact = true 属性。换句话,只要当前路由下有嵌套子路由,就不要加 exact。
当然可以用 react-router-config 库中提供的 renderRoutes,更优雅的渲染 Route:
| |
Switch
通过匹配选出一个正确路由 Route 进行渲染:
| |
比如路由地址是 /home,那么就只会挂载 path="/home" 的路由和对应的组件 Home。
Redirect
假设有下面这两种情况:
修改地址栏或调用 api 跳转路由时,找不到匹配的路由,又不想让页面空白,就需要重定向一个页面
当跳转到一个无权限的页面,期望不展示空白页面,就需要重定向到一个无权限页面
这时候就需要用到重定向组件 Redirect,Redirect 可以在路由不匹配的情况下跳转到某一指定的路由,适合路由不匹配或权限路由的情况。
| |
当在浏览器地址栏中输入 /router/test,没有路由与之匹配,就会重定向跳转到 /router/home。
| |
如果 /router/list 页面没有权限,就会渲染 Redirect 重定向跳转到 /router/home,反之有权限就会正常渲染 /router/list。
路由改变到页面跳转流程图

总结
本篇学习了 react 两种路由模式的使用和原理,下一篇我们将走进 react redux 的世界。